Saturday, November 27, 2010

A Thanksgiving Feast


A bountiful Thanksgiving day:
Appetizers:
- crab turnovers...my Real Women of Philadelphia winning entry
- cheddar and veggie spread
- deviled eggs

Dinner:
- roast turkey with garlic butter under the skin
- stuffing (my husband's family specialty, done by my husband and his mother)
- gravy (by my mother in law)
- garlic mashed potatoes
- salad and fixins: romaine lettuce, spring mix, mushrooms, carrots, grape tomatoes, cucumbers and various dressings
- candied yams
- homemade cranberry sauce
- homemade white and honey wheat rolls

Dessert:
- pumpkin pie
- apple pie
- vanilla ice cream
- chocolate cookies and cream frozen yogurt
- cool whip
- sweetened whipped cream from my new cream whipper
- leftover Black Forest Brownies, peanut butter fudge, cake truffles (carrot cake, apple spice cake and chocolate mocha)

Thanksgiving Pies


Pie, pie, who doesn't love pie?!? For Thanksgiving this year, my husband's family requested two classics: pumpkin pie and apple pie. And of course I obliged!

Executing the pies was made easier by the fact that I still had 3 pieces of pie dough left in the freezer, just perfect for the single pumpkin pie crust and the double apple pie crust. I just took them out of the freezer on Tuesday night and let them thaw in the fridge. On Wednesday, I rolled out the bottom crusts and placed them in the pie tins (I love my Williams-Sonoma pie tins, by the way...they work perfectly for me). After covering them in plastic, back in the fridge they went. Normally, a pie crust only needs about 30 minutes to relax in the fridge, but I knew I would be pressed for time on Wednesday so I opted to roll out the dough and let it rest over night.

I came home after noon on Wednesday to really get into the thick of my Thanksgiving cooking. These two pies were high on my priority list. The pumpkin pie couldn't be simpler...just some pumpkin, eggs, spices and condensed milk and voila! Into the oven it went without an issue. I placed the pie on a cookie sheet since the tins have holes to allow for air circulation so that I wouldn't end up with some drippings in the bottom of my oven. Oven cleaning is never a fun job!

I went to work with the apples. I did 50:50 of Braeburn and Granny Smith apples, a combination that complemented each other in the final pie. Using my handy dandy vegetable peeler and one of those 8 section apple slicers, I got through all the apples in no time. I just sliced all the apples sections into two more slices so they wouldn't be too thick. I always worry that the apples will be all brown before I finish, but that wasn't the case at all.

The recipe I used called for caramelizing the apple juice after they had macerated in the lemon juice and sugar. This was to be done in the microwave. Even though I followed the directions, the caramel did not seem appetizing so I didn't bother with it. I would rather not ruin all the beautiful apple slices that I already had.

The monstrous mound of apples went into the bottom crust. I carefully rolled out and added the top crust. The mound had to have been more than 6 inches above the rim of the pie! All the apples cooked down just as they should and this was the best tasting apple pie I have made so far. The looks of the crust are getting better each time; it always feels good to feel that sort of progress and pride in my work!

Even though both pies looked delicious, I had to wait until Thursday to cut into them. All the reviews were highly positive and I look forward to more pie adventures in the future!

My first sales!!!


It finally happened!!

My husband's boss and one of his coworkers gave me my first orders: two dozen carrot cake truffles and one dozen apple spice cake truffles. I can't tell you how excited I am, I love sharing my creations with people and love it when I can do something to make other people happy.

Tuesday, November 23, 2010

Thanksgiving Display


Each Thanksgiving, the people on my floor come together to have a pot luck lunch to celebrate the holiday. With the ethnic diversity we have here, the choices span the globe a few times over.

With me being me, I couldn't decide on what I wanted to bring. I wanted to make something with chocolate, as a test run for the Godiva contest I mentioned earlier. I have been thinking in the back of my head about Black Forest Brownies...making a dark chocolate fudgy brownie with chunks of cherries and chocolate with a cherry fudge icing. The recipe got rave reviews so I think this will be my submission. Wish me luck!

I knew I would make more than one thing since there are so many sweet things to choose from out there! My second selection was a result of my husband's Thanksgiving party. I had made apple spice cake truffles and mocha chocolate truffles for his get together. His boss asked if I also make carrot cake truffles. I haven't made those yet, but I figured this would be a great time to test them out. I had to shred the carrots with a box grater, so the pieces were larger than I would have liked. It will be a food processor in the future! I mixed the cake with vanilla buttercream icing, then dipped that in white chocolate. I know that cream cheese frosting is typical of a carrot cake, but since the truffles are kept at room temperature, I didn't feel comfortable making something with cream cheese, even if it was encased in chocolate. I kept the buttercream light and vanilla to complement the carrot cake without distracting from all the wonderful spices in the cake.

So I had something dark brown and something white. I decided to add something tan colored for a pretty color palate. It came down to peanut butter fudge or rum raisin fudge. The cherry fudge icing for the brownies has Kirsch in it, so I opted for something without alcohol...the peanut butter fudge.

I had fun all weekend getting all of these made. I started thinking of the presentation. With the round cake balls, I cut the brownies into triangles and the fudge into small squares. All of it looked so pretty and I couldn't have been prouder! I put a three tier cake stand in the car and was all set for my party.

I had great complements about the brownies. I think I like the recipe the way that it is, but I have until Dec 31st to change it up if I come up with something I want to do a bit differently. People must have enjoyed the carrot cake truffles and the fudge since almost all of them were gone by the middle of the afternoon. There was another carrot cake at the party that I really liked. I asked for the recipe and hopefully she will remember to bring it in for me. Then I will have the two recipes to choose from in the future and see which one works better for cake truffles.

In the end, I had a great time creating, loved the way the display turned out and I had some yummy sweets for me!

Saturday, November 20, 2010

Calzones...and the last of the mozzarella


This dough recipe is adapted from the King Arthur Flour website (http://www.kingarthurflour.com/recipes/calzone-recipe). The dough formula was used, but the procedure for making the dough and other things were altered. Here is what I did:

1 packet active dry yeast
2 cups lukewarm water
1 tablespoon sugar
6 cups all purpose flour
1 tablespoon salt

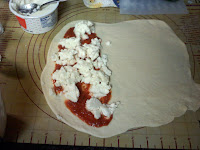
Filling options: homemade mozzarella, ricotta cheese, pizza sauce, sauteed mushrooms and broccoli with garlic

1. Dissolve the yeast in some of the water and the sugar. Let proof for 5-10 minutes.
2. Combine the rest of the ingredients in the bowl of a stand mixer. Stir to combine. Use the dough hook on the mixer to knead the dough on medium speed for 5-7 minutes.
3. Place dough in a large bowl coated in cooking spray. Cover and rise until double in bulk.
4. Divide the dough into 4 equal portions and roll out to as large a rectangle as possible.
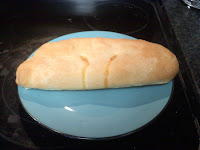
5. Fill one half with the desired toppings. Fold over the other half of the dough. Press the dough together and tuck under. Transfer to a large baking sheet.
6. Allow the dough to rise for about 30 minutes. Cut two small slits in the top of each calzone to allow steam to escape.
7. Preheat oven to 375F. Bake 25-30 minutes or until golden brown. Cool slightly before serving.

Inside out mozzarella burgers


Thursday, November 18, 2010

Orange Chiffon Cake


A friend of mine at work is leaving this week and I didn't want the event to go unnoticed. I have been super busy this week at work, but I knew I wanted to do something. It just couldn't be some complicated torte or anything. I also wanted to keep her tastes in mind. She likes lighter desserts rather than something super chocolaty. With all that in mind, I decided to make an orange chiffon cake.

Chiffon cakes are much like angel food cakes in that they are light and fluffy and baked in a tube pan. The big difference is that chiffon cakes have egg yolks in the batter, which results in a richer cake than an angel food cake. The batter is still leavened with egg whites to produce a tall airy cake. Usually chiffon cakes are citrus flavored. I didn't have to decide what kind to make considering the only citrus I had in the house was orange! And like angel food cakes, a heavy frosting is undesirable. This cake will be topped with an orange flavored glaze. The result is a pretty, fluffy, light cake that does not take lots of extra effort to look and taste great!

Cheesy Pizza


My husband's mother makes homemade pizza fairly often. In order to avoid lots of mixing and kneading of the dough, she uses Pillsbury Hot Roll mix as the base. Then adds sauce and the cheese. And voila, a tasty homemade pizza made before you know it.

I have made pizza this way many times over the last two years. I decided to make it special with my homemade mozzarella. I drained the cheese about an hour before using it, but it was still a bit soft in a few places when I went to shred the cheese on my box grater. It still worked, but it got a bit messy. Ah well...I can't be in the kitchen without making a mess of some sort!

Here's how I did it:

1 box Hot roll mix
15 ounce can tomato paste
salt, pepper, garlic powder, onion powder and oregano
homemade mozzarella, shredded

1. Prepare the mix using the pizza dough directions found on the side of the box (note that this preparation is slightly different from the roll directions found on the back). Knead slightly to make sure the dough comes together.
2. Preheat the oven to 400F. Spray a cookie sheet with cooking spray.
3. Rub butter on your hands and transfer the dough to the cookie sheet. Carefully spread the dough to the edges, making sure to press the dough up the sides of the cookie sheet to form a crust. Be patient, it may not seem like it will ever cover the cookie sheet, but trust me, it will. Periodically add more butter to your hands to keep the dough from sticking. Let the dough rise undisturbed for about 10-15 minutes.
4. Prepare the sauce: Combine the tomato sauce and seasonings to taste. I'll be honest, my husband mixes the sauce, so I am unsure as to the exact proportions of all the seasonings. You could also use the pre-seasoned cans of tomato sauce, if desired.
5. Pour some of the sauce over the pizza dough, spreading to the edges. Not all of the sauce will be needed. If you prefer less sauce, an 8 ounce can may be sufficient.
6. Sprinkle on the mozzarella. Not every spot needs to be covered, the cheese will spread to cover the entire pizza.
7. Bake in the oven until the edges are lightly golden brown and the cheese has melted, about 12-15 minutes.
8. Remove the pizza from the oven and allow it to cool slightly so that the cheese sets up enough for the pizza to be cut. Cut the pizza into 12 equal slices.

Tuna Mozzarella Melts


For dinner this week, I made myself a tuna mozzarella melt. Here is what I did:

3 halves of white rolls (made earlier in the week)
grainy mustard
1 can of tuna packed in water, drained
salt and pepper to taste
homemade mozzarella

1. Spread a layer of mustard on each of the roll halves.
2. Season the tuna with the salt and pepper. If desired, add chopped pickles. Divide amongst the rolls.
3. Slice the mozzarella and place one piece on each sandwich.
4. Toast in a toaster oven until the roll is toasted and the mozzarella is melted. Enjoy!

Sunday, November 14, 2010

Another test run of rolls for Thanksgiving dinner


I wasn't completely happy with the whole wheat rolls I made the other week, so I wanted to try a different recipe before the big day. I opted for white rolls, rather than whole wheat since achieving a good flavor balance and roll density is a bit trickier in a whole wheat product versus one made with white flour. I am much happier with these rolls and unless I get time to try out yet another recipe before next week, this is what I'll be serving on Thanksgiving day:

Soft white dinner rolls from the King Arthur Flour website:

http://www.kingarthurflour.com/recipes/soft-white-dinner-rolls-recipe

While perusing the website I got distracted by the following. Could this be my next bread to try? Maybe I can make these buns to use for leftover turkey sandwiches. Cheese Burger Buns...sounds yummy!!
http://www.kingarthurflour.com/recipes/cheese-burger-buns-recipe

Caramel Corn...yummy!


My future sister-in-law's birthday is this week so I sent her a birthday gift in the mail. Rather than use lots of packing peanuts, I decided to make a bunch of caramel popcorn in sandwich bags as filler. So it is greener since I avoided buying and using more plastic and it just happens to be quite yummy!

From the Better Homes and Gardens cookbook:
7-8 cups popped popcorn
3/4 cup packed brown sugar
6 tablespoons butter
3 tablespoons light corn syrup
1/4 teaspoon baking soda
1/4 teaspoon vanilla

1. Remove all unpopped kernels from popped popcorn. Put popcorn into 17x12x12 inch baking or roasting pan. Keep popcorn warm in a 300F oven while making caramel mixture.
2. For caramel mixture, in a medium saucepan combined brown sugar, butter and corn syrup. Cook and stir over medium heat until mixture boils. Continue boiling at a moderate, steady rate, without stirring, for 5 minutes more.
3. Remove saucepan from heat. Stir in baking soda and vanilla. Pour caramel micture over popcorn; stir gently to coat. Bake in a 300F oven for 15 minutes. Stir mixture; bake 5 minutes more. Spread caramel corn on a large piece of buttered foil to cool. Store tightly covered for 1 week.

Mighty Mozzarella


I think I finally figured out the tricks to making mozzarella. First, I used the instructions found on chow.com (http://www.chow.com/food-news/54705/make-your-own-mozzarella/?tag=search_results;results_list). There are some slight differences between this method and the method I had tried before.

The second change I made was to use a whole milk that is pasteurized but not homogenized. Raw milk seems to be the preference for making cheese, but that is something that I would have to get directly from a farm. And then there are always the safety concerns involved with nonpasteurized milk. I bought milk from a farmers' market that came from Johnston Family farms. The market was a bit far away, but I happened to be going for another reason. It is also a bit expensive, at $6 per gallon. I bought two gallons for this attempt at cheese making. The dairy website says it is sold at a market about 10 minutes from where I work, but I haven't called to make sure it is there. I also saw somewhere that it can be found at whole foods, which is less than 5 minutes from work.

I am not sure if the different milk or the change of recipes or a combination of both is what did the trick. But whatever it is, I found my first success in making homemade mozzarella. One gallon of milk produced about 6-7 balls of cheese a bit smaller than a baseball.

I debated about making homemade ricotta with the second gallon of milk, but I have been working late a bunch this week, so I opted to make a second batch of mozzarella so I wouldn't have to think about another recipe. I have used the mozzarella in a variety of ways this week, all of which will be discussed soon!

Friday, November 12, 2010

Jamaican Coconut Pie


A friend at work lent me 'Home Baking' by Jeffrey Alford and Naomi Duduid, an interesting cookbook with recipes from around the world combined with tidbits about various regions and their cooking.

I decided to make the Jamaican Coconut pie for the following reasons: 1, I wanted to make something from this book to bring to work; 2, I already had some pie crusts frozen; 3, I had coconut in the pantry, which my husband will have nothing to do with; 4, it did not require a large amount of effort for the final product so I could make it on a random Thursday night. So combining all reasons, this was the perfect thing to make.

I thawed my pie crust all day in the fridge and rolled it out when I got home. I placed the 9 inch pie plate in the fridge to rest during dinner. So ignoring the pie crust parts of the recipe, here is the filling and make up of the pie, copied or paraphrased directly from the book,:

Coconut Filling:
1 1/4 cups dried unsweeteneed shredded coconut or sweetened shredded coconut
1/2 cup boiling water (if using dried coconut)
1 cup packed light or dark brown sugar (I used light)
1/4 cup cornstarch
2-3 tablespoons butter

Directions:
1. If using dried coconut, place 1 cup of it in a bowl and pour over the boiling water. Let stand for 10-15 minutes.
2. In a small bowl, mix together the sugar and cornstarch, then stir in to the coconut mixture. Or mix the sugar and cornstarch in a medium bowl and stir in 1 cup of the sweetened shredded coconut.
3. Melt the butter in a small pot over medium-low heat. Add the coconut-sugar mixture and cook for about 2 minutes, stirring occasionaly to prevent burning or sticking, until the mixture thickens.
4. Transfer to a bowl to cool to room temperature. Stir in the remaining 1/4 cup coconut and spread the filling in the pie shell, mounding in the center and then spreading it outward.
5. Preheat the oven to 375F with the rack on the upper third of the oven. Bake the pie until lightly touched with brown, about 35 minutes. Let stand for at least 10 minutes to firm up and serve warm or at room temperature.

My impressions:
I mixed the coconut, cornstarch and sugar together and added to the melted butter. I didn't think it was right to not add any water, but I started off following the recipe. A few minutes in, I give in and follow my gut...I added about 1/2 cup water. I just couldn't see how the mixture would thicken without it. Cornstarch needs water to act and I was afraid that the sugar would caramelize or even worse, burn. Once I added the water, the mixture boiled easily and finally started to thicken.

Since I am impatient, I placed the pot in the fridge to cool faster. That and I didn't want to clean another bowl. I got even more impatient after 15 minutes and put it in the freezer for 10. That did the trick. I pulled out my prepared pie crust and poured the filling in...well, what filling I had any way.

This was another moment where I debated just giving up on the recipe, but since I had gotten so far, I just followed through. The filling only seemed to occupy 1/4 of the pie. This was looking like a very sad pie so far, but into the oven it went.

I kept an eye on it, thinking I may need a pie shield to protect the crust, but it didn't happen. I am very glad I put the pie plate on a baking sheet because some of the filling seeped out through the bottom. One major mess averted!!!

Once the time was up, the pie looked light brown, so I took it out to cook. I was pleasantly surprised that the pie did not look as sad as it did when it went in the oven! Between the crust shrinking some and the filling thickening even more, it looked proportional. I cooled the pie and put it in a container to take to work.

This morning, I brought the pie to work to share. I hadn't thought of tasting it, so I figured I would have a small piece before I let everyone else try it out. Nothing like a little quality control, huh? I was very surprised in how the pie turned out. The crust was nice and flaky, which is something I always worry about. The filling was very sweet, chewy and candy-like. It is not something I would want all the time, but is good on occasion.

I made a few copies of the recipe and put them out by the pie. And by 10AM, all the copies and the pie were gone. I think I can take that as a good sign!

Thursday, November 11, 2010

Whole wheat dinner rolls


With Thanksgiving right around the corner, I have started to formulate a menu in my head. Since I have my baking textbook now, I want to make my own dinner rolls and decided to try out a recipe this weekend.

I took a recipe for white sandwich bread and followed the suggestion to include white whole wheat. This was done by substituting 3/4 of the flour with white whole wheat and using bread flour for the remainder. In my recent experience, white whole wheat has had a good flavor and hasn't had as strong a flavor as traditional whole wheat. So I was thinking I could get away with a whole wheat roll that didn't taste too strong.

I combined the ingredients and kneaded the dough in my stand mixer and let it rise. I had to let the dough ferment for several hours since my house was only about 65 degrees. Once it had finally doubled, I portioned the dough into 1 ounce pieces and rolled them into balls. I placed three into each cooking spray- coated muffin well for cloverleaf rolls. I didn't have the correct amount for all the rolls, so I ended up making two that only contained two pieces of dough. I wanted to try the cloverleaf set up for something a little fancy looking without too much extra effort.

I let the dough proof and used an egg wash consisting of an egg yolk and milk, which is supposed to make for a softer crust. A harder crust can be made using a whole egg and water. I baked the rolls until they were a beautiful golden brown. After removing from the oven, I added some butter to the tops to make sure the crusts really were soft. Are you seeing a pattern here? My husband can't stand very crunchy crust, so I do what I can to make sure it stays soft so the bread will actually get eaten!

The rolls looked perfect, but did they taste good? Now that is the important part. The crumb was fine and consistent, no tunneling or other sign of incorrectly mixed bread. The whole wheat taste did come through a bit more than I expected and I do not think it is what I am looking for for Thanksgiving dinner.

Also, the three one ounce balls of dough per roll made for very large rolls. I think I will go for three 1/2 ounce balls instead. I think I will test out another recipe before Thanksgiving. My book also has ones for soft dinner rolls and milk bread, which sounds lovely. Hopefully I will have time to test out at least one of those before Thanksgiving, otherwise I may just fly blind and hope that it works out!!!!

Tuesday, November 9, 2010

Getting back into the habit

I've been quite busy the last few weeks. Work kicked in to overtime just before and immediately after I went on vacation for a week. Its almost like I never left! Well, after I spent an entire day fixing all the things people messed up while I was gone...

I haven't been in the kitchen much recently, but that is sure to change with Thanksgiving coming up. My husband's family will be visiting, so I will have plenty of opportunity to cook while they are here. His mom offered to help, but I am leaning towards doing most, if not all by myself just because I enjoy it so much.

So far I know I'll be making turkey, stuffing (my husband's special stuffing is a non negotiable aspect of the dinner), gravy, homemade cranberry sauce, homemade yeast rolls, mashed potatoes and pumpkin pie. I am thinking of also making sweet potatoes, creamed onions (which I have never had, but saw a recipe for and it intrigued me), and some other kind of dessert. The dessert is still very much in the air..could be an apple pie, a chocolate cake, cookies...I haven't decided yet.

I have also been thinking of two more contests I have come across. I have a few recipe ideas in the back of my head, but still need to think them through and test them out.

The first is through Godiva (http://www.foodandwine.com/promo/godiva) and they are looking for a chocolate dessert. I think I can only submit one recipe and of course it must contain at least on Godiva product. I have until the end of the year for that one. I may test out some ideas for Thanksgiving. The grand prize winner gets a trip to SWEET at the Food and Wine Festival in NYC in 2011, round trip airfare and accommodations for 2 nights for the event and the possibility that the recipe will be featured in the Godiva catalog. Sounds like a great time to me!!!

The other is through King Arthur Flour (http://www.nationalfestivalofbreads.com/enter/default.aspx), which runs through February 7th. You can submit multiple entries for each of the following categories: ethnic breads, rolls, time saving/easy, and whole grain breads. Each recipe must contain Fleischmann's yeast and King Arthur Flour. 8 finalists will get $500 and a trip to Wichita to compete live. The grand prize winner will get a trip to Vermont for one the King Arthur Flour baking education classes, as well as $2000 cash. I need to start thinking through lots of ideas for this one!