Sunday, November 27, 2011

Gingerbread Houses


Here is a great gift idea for the holiday season...mini gingerbread houses. These cute houses, made of graham crackers, are held together by royal icing and decorated with peppermints, Kit-Kats, colored sprinkles and cinnamon red hots. Inside the houses lies another surprise, actually several surprises: mini chocolate candies like Crunch Bells and Hersey's candies. Each house is about 5 1/2 inches high, 3 inches wide and 4 inches long. They are $15 each. Call or email if you would like these beautiful houses as gifts this holiday season.

Wednesday, November 16, 2011

Rum banana pudding


As a second dessert for my husband's office Thanksgiving party, I chose another recipe from my "Southern Living: 1001 Ways to Cook Southern" cookbook: rum banana pudding. Adding a little alcohol to a southern favorite, what could be better?

This recipe starts with a classic homemade vanilla pudding that is enhanced by a little rum. Toasted chopped pecans add some crunch and it is topped with a meringue that is baked until a perfect golden brown.

Courtesy of the Southern Living website, here is the recipe:

Rum Banana Pudding

Ingredients

  • 1 1/2 cups milk
  • 2/3 cup sugar
  • 2 egg yolks
  • 3 tablespoons cornstarch
  • 3 tablespoons light rum
  • 1 teaspoon vanilla extract
  • 6 medium bananas, sliced
  • 30 vanilla wafers
  • 1 cup chopped toasted pecans
  • 2 egg whites
  • 1/8 teaspoon cream of tartar
  • 2 tablespoons sugar

Preparation

  • Whisk together first 5 ingredients in a large saucepan over medium-low heat; cook, whisking constantly, 6 to 8 minutes or until thickened. Remove from heat, and stir in vanilla. Let stand 5 minutes. Gently stir bananas into pudding mixture.
  • Arrange 15 vanilla wafers in a single layer on bottom of a 1 1/2-quart baking dish; sprinkle 1/2 cup pecans evenly on vanilla wafers. Pour half of pudding mixture on top of pecans in dish. Repeat layers with remaining vanilla wafers, pudding, and ending with pecans.
  • Beat egg whites and 1/8 teaspoon cream of tartar at high speed with an electric mixer until foamy. Add 2 tablespoons sugar, 1 tablespoon at a time, beating until soft peaks form and sugar dissolves (about 1 to 2 minutes). Spread meringue evenly over top of banana mixture, sealing edges.
  • Bake at 400° for 8 to 10 minutes or until golden brown.

Red Velvet Cheesecake


My husband's office Thanksgiving party is this Thursday and I wanted to contribute. Mostly because my work isn't doing a Thanksgiving party this year and I really want to cook!!!

I came across a recipe for a red velvet cheesecake in my "Southern Living: 1001 Ways to Cook Southern" Cookbook and was intrigued. I know that a lot of my husband's coworkers really like red velvet cake so this twist seemed like a natural choice.

This cheesecake starts with a chocolate graham cracker crust, then the red velvet cheesecake and is topped with a fluffy white sweetened cream cheese topping. I made the crust and cheesecake last night and it chilled overnight. Tonight I will add the topping and take pictures.

This cheesecake is easy enough. The only snag I ran into was with the graham cracker crust. I went to my trusty volume to weight conversion sheet and weighed out the graham cracker crumbs rather than trying to stuff them into measuring cups. Either I looked at the wrong conversion or their conversion was WAAAAAY off. Like three times the amount of crumbs than I needed. I poured them into the springform pan and it practically took up the bottom 1/3 of the entire pan. I immediately knew something was wrong. So I went back and measured out the proper amount and needed to add a little more butter to hold the crumbs together. But the problem was fixed easy enough.

The cheesecake batter is very much a deep red. That is what two 1 ounce bottles of red food color will do. I can't wait to add the topping tonight and take pictures, the dark crust with the red filling and white top should have a beautifully dramatic look to it. I just hope it tastes as good as it looks!

UPDATE: Evidently the cheesecake was a big hit, my husband didn't even get a chance to try it. He said it was gone before lunch even started because some people grabbed their desserts first, hid them in their offices and then went for lunch. Not a bad strategy in my opinion!

Courtesy of Southern Living, here is the recipe:

Red Velvet Cheesecake

Ingredients

  • 1 1/2 cups chocolate graham cracker crumbs
  • 1/4 cup butter, melted
  • 1 tablespoon granulated sugar
  • 3 (8-ounce) packages cream cheese, softened
  • 1 1/2 cups granulated sugar
  • 4 large eggs, lightly beaten
  • 3 tablespoons unsweetened cocoa
  • 1 cup sour cream
  • 1/2 cup whole buttermilk
  • 2 teaspoons vanilla extract
  • 1 teaspoon distilled white vinegar
  • 2 (1-ounce) bottles red food coloring
  • 1 (3-ounce) package cream cheese, softened
  • 1/4 cup butter, softened
  • 2 cups powdered sugar
  • 1 teaspoon vanilla extract
  • Garnish: fresh mint sprigs

Preparation

  • Stir together graham cracker crumbs, melted butter, and 1 tablespoon granulated sugar; press mixture into bottom of a 9-inch springform pan.
  • Beat 3 (8-ounce) packages cream cheese and 1 1/2 cups granulated sugar at medium-low speed with an electric mixer 1 minute. Add eggs and next 6 ingredients, mixing on low speed just until fully combined. Pour batter into prepared crust.
  • Bake at 325° for 10 minutes; reduce heat to 300°, and bake for 1 hour and 15 minutes or until center is firm. Run knife along outer edge of cheesecake. Turn oven off. Let cheesecake stand in oven 30 minutes. Remove cheesecake from oven; cool in pan on a wire rack 30 minutes. Cover and chill 8 hours.
  • Beat 1 (3-ounce) package cream cheese and 1/4 cup butter at medium speed with an electric mixer until smooth; gradually add powdered sugar and vanilla, beating until smooth. Spread evenly over top of cheesecake. Remove sides of springform pan. Garnish, if desired.

Thursday, November 3, 2011

Cafe Contest

I recently stumbled across an opportunity like no other: the chance to win a fully equipped cafe space plus $10,000 start up money. I was in shock reading about this contest. The company is giving two people the chance to start up their own businesses, one a sandwich shop/cafe and the other a mini spa. In addition to the space and the start up money, they are offering advertising, a well traveled location and affordable rent.

What could be better than that? To have the location and the resources to get my own business going. Starting up is the hardest part of any business, you need the capital to get the products you need and the money to advertise your business.There are great business ideas that never get off the ground because of undercapitialization. This contest will catapult two people from dream to reality before they know it.

Of course I submitted my entry and am now praying that my concept is just what they are looking for. I know I will work harder than anyone and will put 110% of myself into the business. I am fully aware of the potential positive outcomes of this situation and all I can do now is to keep on hoping and praying. Whatever is meant to happen will happen...I just hope this is the great opportunity that I have been waiting for!

Tuesday, November 1, 2011

Canadian Cheddar Cheese Soup

I mentioned recently about the Canadian cheddar cheese soup I had at the Epcot Wine and Dine festival last month. I made sure to buy a cookbook with various recipes from the festival, double checking that this recipe was among those listed.

Since my husband was such a fan of the soup, this was the first recipe I tried out from the cookbook. I also made sure to make a double batch so there would be plenty to keep in the freezer to last us for a while. I think it really turned out just like the one from the festival. I was a little bit worried since sometimes recipes do not exactly replicate the flavors you remember. But this recipe was spot on!

If I was making this soup for just me, I would decrease the amount of beer added. That is just because I am not a fan of beer in the first place. For those of you that enjoy beer, it is a great complement to the cheese. Everyone that likes beer, evenly mildly, enjoys this soup just the way it is.

In case you wanted the recipe, here it is again, copied from the Disney Wine and Dine Festival Recipes page:

Cheddar Cheese Soup

Makes 6 cups

Ingredients:
1/2 pound of bacon, cut into 1/4-inch pieces
1 medium red onion, cut into 1/4-inch pieces
3 celery ribs, cut into 1/4-inch pieces
4 tablespoons butter
1 cup all-purpose flour
3 cups chicken stock
4 cups milk
1 pound sharp white cheddar cheese, grated
1 tablespoon Tabasco sauce
1 tablespoon Worcestershire sauce
Coarse salt, freshly ground black pepper, to taste
1/2 cup pale ale, room temperature
Chopped scallions or chives, for garnish

Directions:
1. Cook bacon in a 4- or 5-quart saucepan over medium-high heat, stirring frequently until lightly browned, about 5 minutes.
2. Add onion, celery and butter; sauté until the onion softens, about 5 minutes.
3. Reduce heat to medium. Add flour and stir constantly for about 4 minutes.
4. Whisk in chicken stock and bring to a boil for 1 minute. Reduce heat to medium-low and simmer for 15 minutes, stirring occasionally.
5. Add milk and continue to simmer for another 15 minutes. Do not boil after adding milk.
6. Remove from heat. Stir in cheese, Tabasco, Worcestershire, salt and pepper until cheese is melted and soup is smooth. Stir in ale. If soup is too thick, thin to desired consistency with warm milk.
7. Serve hot, garnished with scallions or chives.

Chocolate and Pumpkin Whoopie Pies...Come and Gone before I got a picture!!

This weekend for the GHA Farmers Market, I decided to go with a fall theme, in addition to some classics. I brought all 12 varieties of my cake truffles and some chocolate chip and brown sugar cookies. Those are always a hit!

To get into the fall/Halloween spirit, I made some chocolate whoopie pies with a pumpkin cream cheese filling. The pumpkin gave the filling a beautiful orange color against the springy chocolate cookies. A little cinnamon and cloves gave a nice earthly addition to round out the flavor. They tasted amazing and were a great start to the fall. A few people suggested I make a peanut butter filling in the future, which is a great idea. What could go wrong with peanut butter and chocolate?!?!

I also made some layered mint fudge. The top and bottom fudge layers were separated by a white chocolate mint fudge that was dyed green. Another great color combination for Halloween! In the end, all the treats looked great!

Sunday, October 23, 2011

GHA Farmers Market

Come visit me at the GHA Farmers Market this Sunday, October 30th from 1-5PM at Gilliland's Heritage Alpaca Farm in Hoschton, GA. I will have some great Halloween and fall-inspired treats.

Stay tuned later this week for pictures of all my sweets you will find there.

Good cooking is all the chemistry

Check this out! Found in the Gwinnett Daily Post Sunday October 23, 2011

LARSON: Good cooking is all in the chemistry

It's a funny thing how memories are triggered. I was strolling through the Lilburn Farmers Market last month when I saw what I thought to be a high school girl selling the most beautiful little truffles, brownies and pies I've ever seen. It made me think of all the times I'd subbed in advanced placement gifted chemistry classes. Invariably a student would ask me, "Are you a real chemistry teacher or are you just a mom?"

"I'm just a mom," I'd reply, "but I'm so glad to be subbing for a class full of such highly intelligent students, because I have a question you might be able to answer. When I bake cookies, I always use the same ingredients, but sometimes they puff up in a mound and sometimes they are flat. Why is that?"

No one could ever give me an answer.

So just to be a wee bit devilish, I asked the young lady how she got her little pastries to come out so perfect each time. She went on to explain in far more detail than I could possibly understand.

It turns out this young lady, Loren Myers, is a research technician at Emory University with a master's degree in biology and chemistry. Her work involves studying the development of the gut in premature infants. Somehow, her side business seemed to connect in a weird sort of way for me, but Myers said that was no so for her co-workers."

"They thought it was strange at first that I would be so interested in cooking, but if you can follow a science experiment, you can follow a recipe. It's all about consistency, quality and keeping good notes," she said.

Myers started baking with her mother as a child and always had a curiosity about the scientific aspects of what happens in the oven or on the stove.

"I made my first cake in fifth grade and the icing didn't look as nice as my mother's. I later realized I had cooked it too long," Myers said.

Over time she became more and more interested not in cookbooks, but in technique books.

"If you know the physics behind baking, you can experiment because you know why things happen."

Myers named her business Sugar Bear Sweetery, after her mother's pet name for her when she was growing up. All her little sweets are scientifically developed in her kitchen and scientifically tested in the lab by her co-workers.

"They all love it when I bring my latest experiments to work and there are a few foodies who give good feedback because they totally analyze things."

If you'd like to learn more about Myers' science projects, visit sugarbearsweetery.blogspot.com. If you'd like to do some scientific research on your own, the Gwinnett Library has several good books on kitchen chemistry.

And I wonder: Do you think we could get Jeff Foxworthy to host a show called "Are you Smarter than an Advanced Placement Gifted Chemistry Student?"

Susan Larson is a writer who lives in Lilburn Email her at susanlarson79@gmail.com.

Thursday, October 20, 2011

Sweet Potatoes!!!!

I had a small space left in my garden this summer and for some reason though that sweet potatoes would be a good idea to plant. I wasn't paying a lot of attention to the space requirements and as the summer went on, the sweet potato grew..and grew...and grew. Before I knew it, the vines took up almost half my garden, killing off my cucumbers.

I tried a few weeks ago to dig up some sweet potatoes, but no luck. I was really disappointed. I went on vacation and forgot about them. It rained the first few days after I got back, so I didn't go look in my garden. Well, yesterday I finally got a few minutes to really look through my garden. Lo and behold, I saw two sweet potatoes starting to break through the surface. I grabbed my trowel and started digging.

Before I knew it, I had a huge pile of sweet potatoes!!! I was dancing and doing my best Oprah 'sweet potato' impression. Probably a little more excited than I should have been, but it felt like such an accomplishment to harvest my sweet potatoes.

The bowl full of sweet potatoes isn't even all of the potatoes out there. I ran out of room to keep them, so I left the rest in the ground. I probably still have just as many left to harvest. YAYAY!!!!

And as the picture above shows, I also have a watermelon or two in there, too. I should bring them inside, even though they are still a bit small since it looks like it will be getting very cold the next few nights. I have loved my garden and everything I have grown tasted so good. Not only because it was fresh from the garden, but also because I knew that I worked to produce it. The sense of pride and knowing just where my food came from is truly empowering.

Wednesday, October 12, 2011

Canadian Cheddar Cheese Soup

I have started a collection of local cookbooks whenever I travel, so of course I was looking for a Disney related cookbook. There are a few out there and my sister in law bought one that had recipes from the Disney cruise ships. It looked interesting, but I wasn't sure if it was quite right. Then we saw the cookbook for the festival and I knew that was it! It contained recipes from several of the dishes we had tried and also had some of the cocktail recipes. When I was flipping through the book, the first thing I looked for was the Canadian Cheddar Cheese soup...yes! It was there and the book was mine! I can't wait to try it out!

My husband's brother and sister in law kept mentioning this 'beer cheese soup' they wanted. That was the top of their priority list when it came to Epcot's Food and Wine Festival, going on now through November 13th. We made it around to the Canadian booth and had to try it. It was a huge hit for my husband!

Even if the book hadn't contained that specific recipe, I could have found a copy on the Festival's website. So I reprinted it here in case you want to try it at home.

Canadian Cheddar Cheese Soup:

Makes 6 cups

Ingredients:
1/2 pound of bacon, cut into 1/4-inch pieces
1 medium red onion, cut into 1/4-inch pieces
3 celery ribs, cut into 1/4-inch pieces
4 tablespoons butter
1 cup all-purpose flour
3 cups chicken stock
4 cups milk
1 pound sharp white cheddar cheese, grated
1 tablespoon Tabasco sauce
1 tablespoon Worcestershire sauce
Coarse salt, freshly ground black pepper, to taste
1/2 cup pale ale, room temperature
Chopped scallions or chives, for garnish

Directions:
1. Cook bacon in a 4- or 5-quart saucepan over medium-high heat, stirring frequently until lightly browned, about 5 minutes.
2. Add onion, celery and butter; sauté until the onion softens, about 5 minutes.
3. Reduce heat to medium. Add flour and stir constantly for about 4 minutes.
4. Whisk in chicken stock and bring to a boil for 1 minute. Reduce heat to medium-low and simmer for 15 minutes, stirring occasionally.
5. Add milk and continue to simmer for another 15 minutes. Do not boil after adding milk.
6. Remove from heat. Stir in cheese, Tabasco, Worcestershire, salt and pepper until cheese is melted and soup is smooth. Stir in ale. If soup is too thick, thin to desired consistency with warm milk.
7. Serve hot, garnished with scallions or chives.

Epcot Food and Wine Festival

I was lucky enough to spend last week in Orlando, experiencing all Disney and Universal Studios has to offer. My husband and I signed up for the Food and Wine Festival Half Marathon Relay. That was the only way he could ever get me to participate in a half marathon. I had to run about 5 miles and his leg was 8. It was an event to kick off Epcot's 2011 Food and Wine Festival and started at 10PM. Yes, PM, not AM. But that meant that the after party in Epcot was filled with lots of food and wine options.

Epcot's Food and Wine Festival is a tapas-type event where 29 different countries/stations offered a few different small plates plus some beer/wine/cocktails that suited their nationality. After the race we only tried a few places, but we also spent an entire day in Epcot eating around the world. It was so much fun and a perfect event for someone like me that enjoys trying lots of different things. To make it even better our parents and my husbands brother and his family were all there. That meant that I didn't need to buy every single thing I wanted to try, we shared a lot of the dishes, which cut down on the price (and just a few of the calories...but hey, it was vacation, they don't count!!).

Here are some of the delicious plates I tasted:
- Mexico: rib eye beef tacos, delicious!!
- China: black pepper shrimp with Sichuan noodles, pork pot stickers...both were big winners!
- South Korea: lettuce wraps with roast pork and kimchi slaw, Boolgogi BBq beef with steamed rice and kimchi...I discovered I am not a fan of kimchi. I have always wanted to try it, but now I know it isn't my favorite.
- Germany: goulash suppe, Nuernberger sausage in a pretzel roll
- Italy: Di formaggio all'Emiliana (baked cheese ravioli with creamy beef Bolognese sauce, Parmesan cheese, and melted mozzarella)
- Hops and Barley: Linda Bean's perfect Maine lobster roll. Another dish I have been looking forward to trying, even though I have not been a big lobster fan in the past (I grew up in Maryland...no seafood beats crab in my opinion). I know lots of people really like this dish, but it wasn't as good as it was hyped up to be. I liked it, don't get me wrong, I was glad I tried it, but it won't be making a repeat appearance in the future. My curiosity was satisfied.
- Singapore: beef Randang (coconut-braised beef) with jasmine rice
- Japan: spicy tuna roll...without a doubt a favorite with my husband. How do I know? I only got a tiny taste before it disappeared!
- Morocco: Kefta pocket (ground seasoned beef in a pita pocket), Harissa chicken roll...both very very good.
- Belgium: Belgium waffle with berry compote and whipped cream
- France: Sparkling pomegranate kir, Parisian Cosmo slush (Ciroc vodka, Grand Marnier and cranberry juice)
- Ireland: Cheese assortment (aged Irish cheddar, Dubliner and Ivernia cheeses) with apple chutney, chocolate lava cake with Baileys ganache
- Canada: Canadian cheddar cheese soup (more on this in the next post), chicken chipotle sausage with sweet corn polenta
- Desserts and Champagne booth: white chocolate macadamia mousse with dark chocolate pearls

This festival lasts until November 13th, so if you are in the Orlando area, be sure to check it out! Its a great time with lots of great food and drinks. I bought a cookbook with a bunch of the recipes in it, so I am sure it will be used often!

Tuesday, September 27, 2011

Homemade Beef Franks


I know I haven't posted much recently, I haven't been making new things very often the last few weeks. The summer was crazy with the Lilburn Farmers Market, which was a great experience and I had a wonderful time! It just took me a little bit to recover from all those crazy days. Now I am rejuvenated and ready to attack new projects!

For my next new experience, I decided it was time to make my own sausages. A few weeks ago my husband and I went to the outlets and I finally got the food grinder attachment for my KitchenAid mixer. I had been thinking about it for about a year or so, but just hadn't bought it. One, I was anxious about buying a $50 attachment. I always worry about money and I also worry about whether or not I will really get any use out of it. I didn't want it to be something that ended up just taking up space in my kitchen. That real estate is getting more and more expensive with all my tools/electrics, etc.

Two, I was worried about making the actual sausages. I've never used natural casings before and didn't know how to handle them. Plus, while I am somewhat of an adventurous eater, the idea still kinda creeped me out a bit. It is one of those things where I know I eat sausages often, but I choose to 'forget' or 'ignore' the whole intestines thing. It works better that way for me.

But if I wanted to control the ingredients, I needed to 'man up' and deal with the casings. I watched a demo at Williams Sonoma a while back and looked back at the notes they gave us. Plus I did a little background checking online. Armed with the information and my natural casings from Patton's Meat Market, I was ready to give it a shot.

For my first attempt, I chose an all beef frank. I found a recipe on thespicysausage.com that utilized beef chuck seasoned with cayenne, coriander, garlic, onions and mace. It sounded interesting to me. I just wasn't in the mood for a pork sausage this time and this recipe seemed simple enough and used ingredients I usually have on hand.

In my internet searches, many sites suggested grinding the meat two to three times. So I took my beef chuck, cut it into long strips and put it in the freezer for 20 minutes (another online suggestion), then put it through my brand spankin new grinder with the coarse grinding plate. I combined the extra ingredients and mixed them in with the meat. I changed out the grinding plate to the fine one and ground the meat for a second time.

It was at this point that I realized I didn't have the sausage stuffer attachment. Ugh!!! I don't know why I was thinking it came in the box, and I don't know why it took this long to notice I was missing a vital piece of equipment. After searching online, I found a store 20 minutes away that had one in stock...crisis averted.

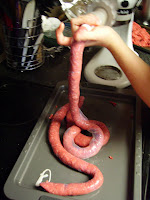
I soaked the hog casings in water for 20-30 minutes, then fed a large amount onto the sausage stuffer attachment (which I greased with a little bit of Crisco to prevent it from sticking). There was no turning back now! Onward and upward. I slowly fed the meat into the food hopper and made my sausages. It took a little bit to get used to feeding the hopper with one hand and guiding the sausage with the other, but it worked out well in the end. I kept the meat cold by placing the tray in the fridge while I fed some through the machine. Well, I said I, but I meant my husband, who had to get up every few minutes to get the tray out of the fridge for me. I only have so many hands, you know.

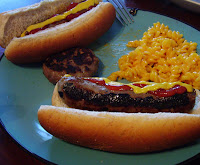
There were a few air bubbles in the sausages, but it wasn't too bad. Nothing a little hole couldn't fix. I sectioned off each link and ended up with about 25 sausages from my initial 4.75 pounds of beef chuck steak. Not too bad. I placed the sausages in the fridge to cure for a few hours before cooking them on the stovetop (the grill was out of gas).

I was really pleased with the final product. I was worried the casing would be a distraction, but everything was very smooth and tasted great. There were a few places where the seasoning was a little bit stronger than others, but that was because the bowl I used was just barely big enough and evidentally I didn't mix it quite as well as I could have. But other than that, it was a great first try. Successful enough that I think there will be more homemade sausages in the future, as well as grinding our own meat for burgers and such.

I froze the remaining sausages to take with us on vacation next week with our families. Hopefully they will enjoy them as much as we do!


Here is the recipe, courtesy of The Spicy Sausage (except I used a hog casing):

5-lb beef chuck, fine ground
3-tbsp coriander
1 1/2-tsp cayenne
1 1/2-tbsp salt
1/2-cup onions, grated
1-cup nonfat dry milk
1 1/2-tsp mace
5-garlic cloves, minced
2-tsp sugar
1-cup water


Combine all ingredients in a food processor and process until very fine
Stuff into lamb or sheep casing

Friday, September 9, 2011

Dal Cuore Market

Come join me (and my s'mores and my cake truffles) at the opening of the Dal Cuore Market in John's Creek TONIGHT!!! This awesome new market is all natural, sustainable and organic. A great addition to the area!

The details:
Tonight, Friday September 9, 2011

Dal Cuore Market
2100 Ray Moss Connector Johns Creek, GA 30022
Johns Creek, GA

Wednesday, August 31, 2011

Introducing Two New Cake Truffle Flavors: German Chocolate and Peppermint Patty!!!


German Chocolate: All the elements of the quintessential German Chocolate cake; a mildly sweet chocolate cake studded with chopped pecans and coconut that is dipped in milk chocolate and topped with sweetened coconut.

Peppermint Patty: Peppermint buttercream enhances a fudge cake to taste just like the candy; its dipped in dark chocolate and topped with chopped peppermint patties to give that extra peppermint kick.

Monday, August 29, 2011

Countdown to Crush Fest

We are rapidly approaching this years Crush Fest at Yonah Mountain Vineyards!!!! Take the drive up to beautiful north Georgia for lots of wine stomping, music-listening, sweet-eating fun!!!

Come be a part of Crush Fest this Saturday from 11AM-7PM in Cleveland, Georgia. The address is 1717 Highway 255, Cleveland, GA 30528. There will be wine stomping, bands, wine tasting, great craft and food vendors and horse-drawn carriage rides!

Sugar Bear Sweetery will be there with cake truffles, including the new German Chocolate, fruit pies, cookies and, of course, s'mores!

Also be sure to check out Saucy Spirits and their delicious wine jellies!!! I can't wait to taste all the new flavors.

Everyday Indulgence will also be a part of this festival, so there will certainly be lots of wonderful things to eat!

I am excited for this event and can't wait to spend the day at the gorgeous Yonah Mountain Vineyards!!

Thursday, August 25, 2011

Final Lilburn Farmers Market Friday 4-8PM


Its been a great season, but it is time for the Lilburn Farmers Market to come to an end. The final market will be this Friday, August 26th from 4PM to 8PM. Come on out to Main Street and enjoy all there is for this wonderful market to offer.

Here is what you need to look forward to at the Sugar Bear Sweetery Booth:

  • Mini Pies: This week there will be peach, veggie pot pie and chicken pot pie. Get a few extra to store in the freezer for those cravings down the road!
  • Cookies: brown sugar cookies, chocolate chip cookies, M&Ms cookies, oatmeal cream pies.
  • Brownie Bites
  • S'mores!!! Brown sugar cookies + homemade marshmallows + milk or dark chocolate + a creme brulee torch = a great take on the campfire classic!
  • I will also have some of my pimento cheese available for those who have been asking for its return!

Friday, August 12, 2011

Crush Fest 2011


Crush Fest this September 3rd 11AM-7PM hosted by Yonah Mountain Vineyards near Cleveland, GA.

Come enjoy good wine, good food, good shopping and lots of fun!!! I will be there with cookies and cake truffles and s'mores. I look forward to seeing you then!!!

Wednesday, August 10, 2011

On the menu for this Friday's Lilburn Farmers Market:

Chicken pot pie
Chili pot pie (both vegetarian and non)
Apple pie
Brownie bites
Brown sugar cookies
Chocolate chip cookies
S'mores!!!

Oh and by special request I will also be bringing some of my pimento cheese that was such a hit two weeks ago!

I can't wait to see you there!

Tuesday, August 9, 2011

Cuban Sandwiches


I have been craving Cuban sandwiches for quite a while now, but I have not had a clue where to go here in Atlanta to satisfy that desire. So rather than keep whining about it, I decided to make my own, thanks to the King Arthur Flour recipe seen below. I mostly followed the directions, except that I cooked the pork in a slow cooker on low for 10 hours. I knew it would make the pork super tender and more flakey than roasting it, but it was the simplest option for me at the time. I am not so picky as to care if the pork was in slices or shredded.

In the end, it was a great dinner. Or dinners I should say. It made enough for three full nights for my husband and myself. I loved the bread and once I got the hang of using my cast iron skillet press, it could not have been better. It will definitely have to be a repeat meal in our household!


Pan Cubano
4 cups (17 ounces) King Arthur Unbleached All-Purpose Flour
4 teaspoons sugar
2 teaspoons salt
2 1/4 teaspoons instant or active dry yeast
4 tablespoons (2 ounces) butter; or 3 tablespoons fresh lard, cut into small pieces
1 1/4 cups (10 ounces) water

Roast Pork and Marinade
1 1/4 pounds boneless pork: roast, ribs, chops, or pork tenderloin
3 tablespoons minced garlic
3 tablespoons minced parsley
1 tablespoon paprika (preferably hot)
2 teaspoons ground cumin
1 teaspoon ground black pepper
1 teaspoon salt
2 tablespoons lime juice 2 tablespoons light corn syrup
2 tablespoons vegetable or olive oil

Sandwich Filling
sliced roast pork
1/4 to 1/3 pound thinly sliced smoked ham
3/4 pound thinly sliced Swiss cheese
dill pickles, sliced (about 11 ounces; about 1 1/2 large "pickle barrel" pickles)
1/4 cup (2 ounces) melted butter or olive oil (1 3/4 ounces)

Bread:
Combine the ingredients as directed at left, using a flat beater paddle or beaters, then switch to the dough hook(s) and knead for 5 to 8 minutes. Transfer the dough to a lightly greased bowl or dough-rising bucket, cover the bowl or bucket, and allow the dough to rise, with a turn, as directed above.

Divide the dough into six pieces, and shape each piece into a rough log. Let the logs rest for 15 minutes, covered, then shape each piece into a smooth batard shape (a log about 8 inches long, slightly tapered at each end). Place the loaves on a parchment-lined or lightly greased baking sheet.

Let the loaves rise, covered, for 1 hour. Brush or spray them with water, and slash one long lengthwise slit down the middle of each loaf. Preheat the oven to 375°F while the loaves are rising. Bake the bread for about 30 minutes, or until it's golden brown. Remove it from the oven, and cool it on a rack. The loaves may be made one day in advance and stored at room temperature, or several weeks in advance and frozen. Yield: 6 sandwich loaves.


Roasting The Pork: Mix all of the marinade ingredients together (all of the ingredients except the pork), and rub this mixture over all surfaces of the pork. Cover well, and refrigerate for 6 to 24 hours.

Place the pork in a roasting pan or ovenproof dish, and roast it in a preheated 425°F oven for 30 to 40 minutes, basting occasionally with the pan juices, until cooked through. Remove the pork from the oven, and cool it completely before slicing thinly.


Monday, July 25, 2011

Ambitious Week

Here is the current lineup for this Friday's Lilburn Farmers Market:

  • Mini Pies: chicken pot pies
  • peach pie
  • Cookies: brown sugar cookies with and without chocolate chips
  • oatmeal cream pies
  • S'mores: The homemade vanilla marshmallows and your choice of chocolate will be back by popular demand this week!
  • Ready to eat foods: Purely Simple Catering will not be at the market this week so I have volunteered to bring the following:
bbq pork with my own secret ingredient barbeque sauce
pimiento cheese
homemade potato chips
sodas

It seems like an awful lot to get done, but I am hopeful I can get to it all. I also hope to make a vegetarian chili pot pie, if I can find the extra time!!!

Wednesday, July 20, 2011

Lilburn Farmers Market This Friday!

Here are a few things to look forward to at the Lilburn Farmers Market this Friday:


Mini Chicken Pot Pies
Mini Cherry Pies
Mini Apple Pies

Brown sugar cookies
M&Ms cookies
And any other cookies that I am inspired to make by Friday!

Monday, July 18, 2011

Tag Line

I am trying to come up with a tag line, any ideas?

So far I like 'where sweet dreams come true'

What do you think? I need some other options.

Wednesday, July 13, 2011

Christmas in July 16th, and July 17th

Time
Saturday at 10:00am - July 17 at 4:00pm

Location
Gilliland Heritage Alpaca Farm
1587 Dee Kennedy Road
Hoschton, Georgia 30548

Created By

More Info
Lots of fun for the whole family! Come join us for the Christmas in July Celebration! 26 plus Artisans of food and art. There will be a water color demostration, cooking demos and tons to of samples. It is July so there will be lots of produce and a Truckload of watermelons available both days! Come join all the fun!Actvities for the whole family. Alpaca tours both days!

Thursday, June 30, 2011

Fourth of July Specials!!!!


It is a holiday weekend, so there will be lots of 4th of July-themed goodies. They are great for your large holiday get togethers or an intimate family gathering. Call or email if you wish to reserve some of these treats. Otherwise, come out to the Lilburn Farmers Market Friday 4-8PM and the GHA Farmers Market Sunday 1-5PM and stock up!


Funfetti Cake Pops:
Enjoy a vanilla cake studded with red, white and blue jimmies that is encased in either red or white chocolate and topped with more jimmies!

S'mores: In addition to my normal s'mores offerings, I also have a special coffee flavored marshmallow. Chocolate and coffee...yum!!!

Mini pies: I have cherry and apple mini pies available. They are individual sized so each person gets their own mini treat! What is more American than apple or cherry pie?

Tuesday, June 28, 2011

Instant Coffee plus sugar syrup = DISASTER

In preparation for the markets this weekend, I decided to add another flavor of marshmallow to my customizable s'mores. I already have 4 types of chocolate to choose from (milk, white, dark and dark with mint) and several other add-ons to make them special (Nutella, peanut butter, raspberry jam, orange marmalade and my recent addition of blackberry Merlot from Saucy Spirits).

Adding another marshmallow option was next on my list. Coffee and chocolate are a great combination and would have a wide appeal.

Here's a brief run through on how to make marshmallows. Soften gelatin in some water in a large mixing bowl with a whip attachment. Make a sugar syrup and heat to 240 degrees and slowly add to the softened gelatin. Once all the sugar syrup has been added, turn the mixer on high and whip for 10-20 minutes, or until thickened. Add vanilla or other flavoring and transfer to a greased pan to set up.

I toyed with where to add the instant coffee crystals. Whether I should add them to the water in which the gelatin softens or to the sugar syrup or at the very end. I didn't think the crystals would dissolve very well if I added them with the vanilla, even though one recipe I found chose to add it then. The water for softening the gelatin needs to be cool and I wasn't sure how the coffee would affect the gelatin.

So I just made my simple syrup in my same pot as usual and added two teaspoons of coffee granules. It made sense and things were going well until it reached a boil. At which time it majorly boiled over in half a second. Which spilled all over the hot stove, which caused a lot of smoke, which made the house fire alarm go off, which made the company call the house, but the house phone's battery was dead so I couldn't answer it, while trying to keep the sugar syrup from running onto the floor, running over to the alarm panel 5 times to shut it off, the dogs were upset at the smoke and the sound, then the garage door starts to open...my husband is coming home, the house phone starts ringing again at the same time as my cell phone, I am able to tell the guy not to send the fire department just as my husband walks in to the mess, all the while he is getting phone calls about the alarm. Then both our cell phones go off at the same time, our friends were calling to see if we were ok since they were evidently our emergency contacts through the alarm company.

Did you follow all that? And it all happened in a span of 2-3 minutes. Needless to say I am more than a little embarrassed about it all. And it doesn't help that I wasn't alone to clean up all the mess and no one would ever know better. Or that I could fix it all then tell people and laugh about it after the fact. But it is what it is. And now I am telling all of you about it.

So what do you think, should I give coffee marshmallows another shot? Maybe I will add the coffee crystals in the end and see how that goes. I am a little gun shy after the disaster I just made, but it happens to the best of us. I just need to pick myself up and keep trying because I never know what I can do until I try.

Monday, June 27, 2011

Farmers Market Updates

This past Friday started out great at the Lilburn Farmers Market. There was a live band playing and a fun activity for the kids. Many of the vendors flew a flag from around the world off their booths and the kids had to come guess which country it represented. Once they did, they got stickers in their 'passport' and when they visited all the booths, they got a goody bag. It was such a cute idea and it really got a lot of people interacting with the vendors they might not have stopped by in the first place.

It was also the first week of Lilburn Idol, which would bring more people to park right next to the market. Unfortunately, it started raining really hard so everyone packed up by 7PM. I believe the Idol competition was to start around 7:30 so I am not sure if it went on or had to be rescheduled.

Despite the rain, there was a really good turnout for the market and I hope it brought some new people in that will become regulars in the future!!

Yesterday I went to the GHA Farmers Market for the first time. This market is held in Hoschton on Sundays from 1-5PM. I am not very familiar with the area (other than the facts that Chateau Elan and the Mayfield Dairy are near by), so I had no idea how many people would be driving through the area. Its at a great location, an alpaca farm, so there is a lot to do. You can take a tour of the farm, sample some goodies from jellies to goats milk cheese to candles, biscotti and of course my wonderful cake truffles, s'mores and mini pies. And Lisa of Everyday Indulgence is always making something very yummy to eat, so bring your family out for a fun filled afternoon and a great meal!!!

Tuesday, June 21, 2011

Quick Update

Hi All!!
I know I've been a bit behind on the blog recently. I had a few out of town trips in a row that has really thrown a wrench in everything! I think I am starting to get everything back under control again. Here's a bit of what I've been up to:

The Lilburn Farmers Market started a few weeks ago and is bigger and better than ever! It is located in downtown Lilburn, just off Lawrenceville Highway. There are lots of great options at the market from pasta to produce to prepared foods to honey and soaps...the list goes on. So stop by and have a great night and find some very yummy things! Visit me on Fridays from 4-8PM. I have my homemade s'mores, cake truffles and mini pies.

This past weekend was Fathers Day and I was asked to come by a Wild BBQ at the Gilliland Alpaca Farm, which is also the location of GHA Locally Grown Farmers Market on Sundays from 1-5PM. Angie and Lisa are great hosts and have really big hearts, they really want the best for everyone. The farm is close to Chateau Elan in Hoschton, GA. It is easily accessible from I-85 and is in a gorgeous location. Not only can you buy products at the market, they also have an order system up on their webpage with four convenient pickup locations. How cool is that?

Now that all my traveling is done for a while, I can get back to focusing on the markets, hopefully spending some weekends at the GHA Farmers Market.

Check in with this blog and my new facebook page to know exactly where I will be and when. But don't hesitate to email me at sugarbearsweetery@gmail.com or call at 770-279-2048 with any questions or orders.

Friday, June 3, 2011

Birthday Cake!!! And Cupcakes!!!


I was asked to make a birthday cake for a coworker last week before going out of town for a few days. It was a bit crazy to get that and 3 dozen red velvet cupcakes for my husband's coworker done in the few nights before a trip to the Caribbean to see my brother get married, but I made it all work. I'm still not sure how it all came together, time must have taken pity on me and slowed down a little.

The cupcakes were straightforward...red velvet cupcakes with a vanilla buttercream frosting. No cream cheese frosting and no decorations. Luckily that was not difficult, it just took some time the night before leaving the country. My husband delivered the cupcakes since he was staying here. He told me that his coworker loved them and they were just what she needed. It was her daughter's birthday and she wanted something to bring in to her class, but knew she wouldn't have time to make it. It worked out well for everyone and it sounds like they all enjoyed the cupcakes!

Back to the birthday cake...My coworker wanted a birthday cake that wasn't too huge, but was two tiered, black/white/hot pink, shaped like a gift box and used the flavors from the Drunken raspberry cake truffle. Baking the layers and the initial layer of hot pink frosting was easy, I even split the layers and put a little raspberry jam in between. But I made sure to give myself lots of time for decorating.

I chose to use buttercream as the foundation because most people I talk to do not like the taste of fondant. Fondant may have a smoother appearance, but I haven't met anyone that actually likes the taste. Why have a pretty cake that no one wants to touch? I did use fondant for the decorations. She gave me a picture of a cake with tiger stripe-like decorations and I knew it would look best in fondant. I also made the ribbon on the box in fondant.

I haven't used fondant before, I was just winging it the best I could. The ribbon and side decorations looked good, but there was still the bow on the gift box to be done. I followed the directions on the fondant box (I bought it because I knew I was short on time) to make the bow. The pieces were not dry enough to put together that night, so I had to wait until the morning I was taking the cake in to work to assemble the bow...risky, I know.

I put together the bow right after waking up so it could set up before being moved to the cake. By the time I was leaving for work, I could tell it had sagged a bunch. I put the bow on and took pictures, which turned out nice. But then the bow was sagging even further than eventually broke. Rather than crying about it and being upset, I had to come up with plan B...and quick! I had a white gift bow that I put on top, hoping it would be good enough. I took some pictures and carefully drove in to work.

I gave her the cake and she loved it!!! I was so excited. I was hoping I had incorporated all the elements she wanted in the way she imagined. Its always nerve racking, but its good in a way because that forces me to be a perfectionist and produce the best product that I possibly can. Pictures will be posted this weekend for all to see. Enjoy!!!

Sunday, May 15, 2011

New Cake Truffle Selection: BLACK FOREST


There is a new cake truffle in Sugar Bear Sweetery's land and it is yummy!

Introducing Black Forest cake truffles:
Imagine a rich devil's fudge cake and chopped sweet cherries are held together with a smooth buttercream frosting before being dipped in milk chocolate and studded with chopped dried cherries.

Is your mouth watering yet?!? Try one today!

Friday, May 13, 2011

New Variation on the Carrot Cake Truffle

I recently had an order for a dozen carrot cake truffles, but without nuts. My normal recipe calls for chopped pecans in both the cake batter and as the garnish. So I made a carrot cake without the pecans inside and came to the dilemma of how to garnish the truffles. I have been trying to make each garnish unique so that the various cake truffles are easily identified.

But what to do with these truffles? I originally thought of the mini marzipan carrots that I have seen in the past. That would be a cute idea. Though I was short on time and did not have an opportunity to go searching for them. So on to something else...

Finally it came to me. What else do some people put in their carrot cakes? Raisins! I don't normally have them in my carrot cake recipe, but knew that was something that is done on occasion. Woohoo! Garnish problem solved. I went ahead and dipped my truffles in white chocolate and topped each one with some raisins. They looked cute! I will have to take a few pictures and post them here.

What it comes down to is this: If I don't currently offer a flavor of truffle you are interested in, please ask! Or if there is something you would like to change about the current lineup, please don't hesitate to ask! I am more than willing to work with you to get you exactly what you are looking for.

I have a few new truffle ideas bouncing around my head at the moment, but I haven't tested them out. Options like a hummingbird cake (a Southern thing for those of you who have never heard of it, check one out at thejoyofbaking.com) and black forest are high on my list.

Any other suggestions? I would love to hear them!!!

Thursday, May 12, 2011

Real Women of Philadelphia Cookbook

It is finally here! My Paula Deen autographed copy of my Real Women of Philadelphia Cookbook!!!!!

Here is my winning entry on page 28:


Thursday, May 5, 2011

Go here for the video fun: http://www.realwomenofphiladelphia.com/user/recipe/orangey-fruit-dip

Here is a wonderfully light spring/summertime dessert that is still creamy and smooth thanks to Philly cream cheese. The orange marmalade brings a bright citrus note to the dip while the ginger gives it a little kick. A sweet ending to a meal that isn't too rich but is certainly satisfying!!
  • Prep time: 10 minutes
  • Cook time: 1 minute
  • Total time: 11 minutes
  • Servings: 12
  • 8 ounce(s) of Kraft Philadelphia cream cheese, softened
  • 7 ounce(s) of marshmallow fluff
  • 1/2 tsp. of vanilla extract
  • 1/4 tsp. of almond extract
  • 1/2 tsp. of ground ginger
  • 1/2 cup(s) of orange marmalade
  • 3 cup(s) of preferred dippers like strawberries, pineapple, grapes, sweetened crispy crepes, etc
Steps
  1. Use a mixer to whip the cream cheese until light.
  2. Add in the marshmallow fluff and mix until combined.
  3. Add the vanilla and almond extracts, ginger and orange marmalade. Continue mixing until all ingredients are combined.
  4. Transfer to a bowl and serve with desired fruit. Some examples are strawberries, grapes, pineapple, mangoes, kiwi fruit, and cantaloupe. If you would like to add in a crunchy dipper, cut dessert crepes into wedges then brush with melted butter and sprinkle with sugar. Place under the broiler for a few minutes until crispy.
  5. Dip can be stored in the refrigerator until ready to serve.

S'mores Cheesecake

You can find the video by clicking: http://www.realwomenofphiladelphia.com/user/recipe/smores-cheesecake

I love all things s'mores and wanted to extend that fervor even further by combining the classic s'mores components of graham crackers, chocolate and marshmallow into a new form...a cheesecake!! Using Kraft Philly cream cheese in a rich chocolate cheesecake makes this dessert super silky and smooth. Sure to be a hit with all your friends and family, not only does this cheesecake taste great but it also evokes those nostalgic feelings we all have when it comes to eating s'mores!
  • Prep time: 15 minutes
  • Cook time: 30 minutes
  • Total time: 45 minutes
  • Servings: 8
  • 8 ounce(s) of Philadelphia cream cheese, softened
  • 3/4 cup(s) of sugar
  • 2 ounce(s) of semi sweet chocolate, melted
  • 1 tsp. of vanilla extract
  • 2 eggs
  • 1 cup(s) of mini marshmallows
  • 1 9 inch graham cracker crust
Steps
  1. Preheat the oven to 350 degrees.
  2. Beat the cream cheese with a mixer on medium speed for 2-3 minutes. Add in the sugar continue beating for another 2-3 minutes.
  3. Add the chocolate and vanilla. Mix until combined.
  4. Add the eggs, one at a time, mixing after each addition.
  5. Fold in the marshmallows with a spoon and transfer mixture to the graham cracker crust.
  6. Bake in the preheated oven for about 30 minutes. The marshmallows will make the cheesecake look a little more puffy than a traditional cheesecake, but that is alright.
  7. Cool and then chill in the refrigerate the pie until set.
  8. Store the pie in the refrigerator until ready to serve.

Strawberries and Cream Pie

Go here for the video!!!
http://www.realwomenofphiladelphia.com/user/recipe/strawberries-and-cream-pie-2

With lots of strawberries on hand, one of the first desserts that comes to my mind is this strawberries and cream pie. A few simple ingredients combine together to sum up more a whole that is so much more than its parts!
  • Prep time: 10 minutes
  • Cook time: 1 minute
  • Total time: 11 minutes
  • Servings: 8
  • 1 cup(s) of heavy whipping cream
  • 8 ounce(s) of Philadelphia cream cheese, softened
  • 1/3 cup(s) of sugar
  • 1 tsp. of vanilla extract
  • 1/2 tsp. of almond extract
  • 2 cup(s) of strawberries, cut in half
  • 1 9 inch graham cracker crust
  • 1/3 cup(s) of hot fudge topping, warmed until spoonable
Steps
  1. Whip the whipping cream in a chilled bowl with a chilled whisk/beaters until soft peaks are formed.
  2. In another large bowl/mixer, beat the cream cheese for 2-3 minutes, or until light and fluffy. Add the sugar and beat for another 2-3 minutes. Add the vanilla and almond extracts and beat until just combined.
  3. Gently fold the whipped cream into the cream cheese mixture, taking care not to over mix.
  4. Pour into the graham cracker crust.
  5. Arrange the strawberry halves on top. Drizzle the fudge topping on the strawberries.
  6. Chill pie in the refrigerator until set and ready to serve. Leftovers can be store in the refrigerator for 2-3 days.

Strawberry Cheesecake Ice Cream


A twist on the classic cheesecake..cheesecake ice cream! Kraft Philly lends itself perfectly in this rich dessert that will have you coming back for more!
  • Prep time: 15 minutes
  • Cook time: 20 minutes
  • Total time: 35 minutes
  • Servings: 16
  • 2 cup(s) of strawberries
  • 8 ounce(s) of Philadelphia cream cheese, softened
  • 3/4 cup(s) of sugar
  • 1/8 tsp. of salt
  • 1 tbsp. of lemon juice
  • 1 tsp. of vanilla extract
  • 1/2 tsp. of almond extract
  • 1 cup(s) of milk
  • 1/2 cup(s) of heavy cream
  • 1/2 cup(s) of chocolate sauce, optional
Steps
  1. In the bowl of a food processor, combine the strawberries, cream cheese, sugar, salt, lemon juice, vanilla and almond extracts. Pulse until the ingredients are fully blended.
  2. Transfer to a large bowl and add the milk and heavy cream. Stir until combined.
  3. Transfer strawberry cheesecake mixture to the bowl of a chilled ice cream maker and prepare ice cream according to the manufacturer's directions.
  4. Transfer to a container and freeze until hardened.
  5. To serve, leave ice cream at room temperature until softened enough to scoop. Serve with chocolate sauce if desired.

Monday, April 25, 2011

Fiesta Bison Bake

This last week was the entree week with cooking creme for the Real Women of Philadelphia contest. I made a video for a Santa Fe burrito over a week ago and submitted it but still wanted to come up with another idea.

So here it is: Fiesta Bison Bake!

Check out the video and recipe here: http://www.realwomenofphiladelphia.com/user_recipe/view/12273/11381/1

It is a bit of a play on the classic frozen macaroni and beef I loved when I was younger. It had macaroni and tomatoes and beef and cheese. I changed it up to use the cooking creme to smooth out the texture of the shredded cheddar and make everything super creamy. I changed the tomatoes to diced tomatoes with green chiles to add some heat. And I changed the ground beef to ground bison to change up the flavor a little bit. Plus, everyone says that bison is leaner than ground beef. It all gets tossed together and then baked in the oven for a bit. Nothing too difficult, but lots of great flavor and texture!!!

My husband said that he really enjoyed this one. He was telling me how he always looks forward to macaroni and cheese-type dishes and is always disappointed. The texture is never quite right and there never seems to be enough cheese to hold everything together. Not with this recipe! He was munching on it from the second I stopped filming, which is the greatest complement ever!

So go try out the recipe. It is great for anyone that likes a little bit of a kick!! If you want to take the idea in a different direction, then you can use plain diced tomatoes with the Italian Cheese and Herb cooking creme or even diced tomatoes with basil and oregano and the savory garlic cooking creme. All great ideas based on the same concept. Just change it around to make it work for you and your family.

STRAWBERRIES!!!!!!

Yay!! It is strawberry time! I made sure to make some time this year to visit Washington Farms to pick my own strawberries. Last year I didn't make it out there and was so disappointed! That wasn't going to happen this year.

I made time on Saturday morning, when the weather people said it would be a perfect day. Well, it was rainy and misty all morning (of course). Since I know how easy it is to get side tracked and the season isn't very long, I made the 40 minute drive out there anyway. This was my first time to the Loganville farm, I have always gone to the one in Watkinsville in the past. It wasn't too difficult to find at all, it was just a bit of a drive from my house.

I quickly gathered my two gallons of strawberries and seriously contemplated picking more. They all just looked too good! I decided that I would stick with the two I had and then if I use a lot of them in the next few weeks, then I would still have some time to get back before all the strawberries were gone.

So here are a few things I have made with the strawberries so far:
- Mixed greens salad with strawberries, mushrooms, salt, pepper and balsamic vinegar
- Strawberry sherbet: I used a recipe from the Williams-Sonoma Desserts cookbook I found at the used book store last week. This turned out great!!! It is nice and smooth and doesn't leave a film in your mouth like some of the homemade ice cream recipes out there. I saw a waffle cone maker in the clearance section of Macy's and couldn't walk by it. So I made waffle cone bowls which were perfect with the sherbet.

I washed and hulled a bunch for freezing because even though strawberries are a good fruit for you, I don't think I can eat 2 gallons all by myself before they go bad. My husband will eat a few here and there, but it is mostly up to me. I think I am up for the task!!!

I have a few other ideas rolling around in my head for the strawberries. It is dessert week in the Kraft Philadelphia Real Women contest so I have a feeling strawberries will be making an appearance.

Wednesday, April 20, 2011

2011 Vegetable Garden

YAY!!! My garden is now officially ready for this season. I got the area tilled and added 33 large bags of soil (yes, thats lots of soil!!!) two weekends ago. And this past weekend, I filled it up with lots of pretty young plants!

Here is a rundown of what I am anxiously awaiting:
early girl tomatoes
grape tomatoes
solar fire tomatoes
jalapenos
okra
black beauty zucchini
crook neck squash
red bell peppers
green bell peppers
cucumbers
sweet potatoes
chives

I planted early girl and grape tomatoes last year and they thrived throughout the summer. I did not have any luck with the heirloom tomatoes (which never grew), the big boy tomatoes (I only got a couple of decent specimens out of this plant), or the roma tomatoes (which always went rotten before ripening and when I tried to pick them while green and ripen inside, they never changed color. So I chose to have two each of the early girl and grape tomatoes. Then I couldn't resist trying one other type. I went with the solar fire tomatoes, which are supposed to be very heat tolerant. We'll see how they fare this year.

I haven't had much okra in the past, mostly the fried kind. But last summer at the Lilburn Farmers Market, I picked up some fresh okra...and LOVED it!!! I roasted it in the oven with some garlic, butter, salt and pepper. Could not have been more perfect. So when I saw okra plants, I just had to buy some. I am really looking forward to the okra and hope mine is just as good!

I am not sure how the sweet potatoes will turn out, but I figured it was worth a shot.

I have one place left for something else, but I can't seem to make a final decision on what to put there. Should I try onions again (they did not seem to do well for me last year)? Or butternut squash (I only got one good plant from it last year)? I saw spaghetti squash plants that seemed interesting, as well. Hmm....I better decide soon!

Sunday, April 17, 2011

Sauteed Poleta


I was trying to come up with some savory ideas for the next Atlanta Underground Market and decided to try out some sauteed polenta triangles. You start with prepared polenta and let it set in the fridge. Then fry it up on both sides to make it crispy...in theory, anyway.

When attempting to figure out the ratio of cornmeal to water/milk I found that the numbers varied to all sorts of extremes. There was the Paula Deen recipe that called for 1/3 cup plus 4 cups liquid. My Better Homes and Garden cookbook said 1 cup cornmeal plus one cup liquid. Other resources online and in my cookbooks fit every spot in between. This was extremely frustrating. I didn't want to waste my time by choosing a ratio that just would not work for me.

I didn't go with the one to one ratio just for cost reasons. If that worked the best, then that would entail lots and lots of cornmeal. Even though I have a 5 pound bag from a grainery in North GA, I wasn't sure if I wanted to go so far as the one to one ratio.

So in the end, I went with a 1:4 ratio...1/2 cup cornmeal plus 1 cup milk and 1 cup water. I heated the liquids to a boil, then slowly added the cornmeal and cooked until thickened. I poured the polenta into a 11x7 inch glass baking dish that had been coated with cooking spray. It came about 1/2 inch or so up the sides. I put a foil cover on and stuck it in the fridge for a day.

I heated a few tablespoons oil in a skillet and went to sauteing the cooked polenta, which I had cut into triangles. The pieces did not crisp up as I had intended. Perhaps I need to make another coating on the outside to make them nice and crispy.

In the end, the sauteed polenta tasted alright, but was nothing spectacular. Adding cheese on top might help, but I don't think I want to go in that direction any longer. I changed focus and will be using my cornmeal to make cornmeal crepes instead. I like that idea much more and a test run turned out just right. Then I can fill the crepes with some pulled pork or black eyed pea gumbo or even some pimento cheese. I love that idea much more for the upcoming market. I want to think a bit more about what side I want to serve with my crepes. Not using electricity makes things a bit more difficult. If I did have access to electricity, then I would easily make my own fries or tater tots. But that is a bit more difficult to do with a butane burner. So I will need to spend some time thinking it over. I have two weeks to get it just right in my head.